Tim McChesney Interview

Tim McChesney knows gravity is season agnostic. If you feel the same, chances are good that you look forward to seeing Tim and his co-workers on screen every year as autumn yields to winter and the ski industry releases their annual bounty of inspirational flicks. Of course Tim’s profession mandates chasing snow, but the last time we crossed paths with him, it was at the old Rampage site in Virgin, Utah on mountain bikes.
We owe a big thanks to Tim for taking the time to talk to us and kinda-sorta going beyond the skis and snow.
Tim McChesney: Instagram | Utah To BC Video – Faction Collective

Where did you grow up and how old were you when you started skiing?
I was born in Minnesota. When I was five-and-a-half, we moved to Bozeman and that’s where I kind of figured out what skiing was. We used to ski at Bridger Bowl. I moved to Utah when I was 17 to try and pursue a professional career in skiing and just be located around the industry. I've been in Utah ever since.
When did you start mountain biking?
I started mountain biking around 4 summers ago. We have pretty sweet mountain biking up in Big Sky and I went five or six times but didn’t really get into it. Living in Park City, everyone is always mountain biking and I finally decided it’s time to invest in a bike. I think I rode it every single day for the rest of that summer.
What are some of the mental parallels you have discovered in skiing and biking?
I think mountain biking is the closest thing to skiing for me. A lot of it is because you are moving so fast and the decision making is very similar. Just like the slightest little movement can change your whole line. You’re constantly focused and it’s similar to skiing for me in that your decisions have to be super quick and precise or it could end pretty horribly.
Do you like lift-served mountain biking or is it always pedaling for you?
I like it all honestly. I try to do a good mix of resort, shuttle laps, bike parks and short pedals or even huge adventure rides. Getting far out there has been cool because I started exploring some of the zones that I spend a lot time skiing in. A lot of them have these old beat-up trails. The craziest one I did was last year. We started in American Fork Canyon and rode from American Fork all the way over to the Wasatch Crest Trail. Then we rode down Mill Creek back to my house. We saw the whole Wasatch Range where I ski. That was awesome. I think it was about 9 hours and it was around 60 miles. There was a lot of hiking mixed into it because a lot of the trails are not purpose-built for mountain biking.


Where are your favorite places to ride bikes now?
I love the whole Park City area, just because you can go on a 20-mile ride and ride so many different trails. Gnarly trails, smooth stuff, good cross-country riding – it's all such a good mix.
Do you run or hit the weight room to keep in shape?
I don’t really do anything and as I’ve gotten older and I see the affects of that. I really feel that the more time I spend on my bike leading up to the winter – the stronger I am on my skis right after that. Usually the first couple of weeks of ski season I’m beat up and sore and tired every day, but if I just spend a ton of time on my bike leading in to the season, my legs feel great right after that. That’s been one of the positive effects of biking for me.
For mountain biking – tubeless tires, 29-inch wheels, carbon frames, and other advances in tech have really changed the game. What are some of the innovations you’ve seen in the ski world over the last few years?
Some of the bindings I’ve been using have some pretty crazy advancements because I do a lot of backcountry skiing. I like to have a touring binding that I can also ski pretty hard on and not worry about them. I use a binding called the CAST touring system which is a new technology that makes it so you can have a solid touring binding with pins, but then ski on a full downhill binding once you descend. That’s changed so much in my skiing and probably the best technical advancement I’ve noticed. Ski boots have definitely gotten so much better as far as having a touring ski boot that you can ski the resort every single day on and just have a warm ski boot for every day.
What new developments do you see on the horizon for the ski market?
People are trying to make skis lighter, stronger, and more durable. But overall, skis are skis and they honestly don't change a ton every year. Whereas the mountain bikes, someone comes out with a new bike with different geometry or lighter parts, stronger wheels and so on. Whereas if you ski, and you've skied five or ten years ago, you really wouldn't find huge differences in them.

Have you ever helped with product development or testing?
I've done product development with Faction skis. I've been with them for almost 10 years now. They started as the new guys in town and now they've grown to be a huge ski brand. I think this is the ninth or tenth winter I have helped with developing some of their skis. I give feedback to whatever I'm spending most of the time on. Just like what I think about flex patterns for different models for varying conditions and durability. I spend a lot of time on these products compared to a regular consumer, so they like to know what's going on with the products and how the cores are holding up.
Woodward Park City opened just over a year ago. Any thoughts on that venue?
It’s awesome. I've been to a couple different locations and I was really looking forward to the Park City one opening for winter reasons and of course summer reasons. I think we lost a lot of local freestyle bike terrain and Woodward has built some awesome bike park trails. I really want to do a backflip on a bike at some point in my life. My goal is to go to Woodward and do it a couple of times into the foam pit. If that goes well, I'll eventually move to dirt, but we’ll see how it goes into the foam pit first.
Have you ever used a foam pit for your skiing?
I haven’t done any of that. It’s fun to go up and build your own jumps and features. A good powder landing is still as good as a foam pit.
Have you ever coached or mentored young skiers?
I coached in person for a program called Access Freeride. Me and a bunch of friends all worked for them for a couple seasons with some awesome kids who have done well at X Games and other competitions. It's pretty cool to see. We coached Colby Stevenson. He won two X Games medals last year.

What were your first big breaks that led to you getting attention from sponsors?
I started out by doing a lot of slopestyle competitions and I ended up winning the Aspen Open. That was so long ago, but it was a big step for me. I did a lot of the film stuff early on, too.
Successful action sport athletes can choose to compete, create content for social media/film, or a combination of both. Do you believe there are negative aspects to this model?
I did a lot of competitions growing up and I wasn't really having a ton of success after a year or two. I just kind of got sick of traveling to events with horrible conditions and having to ski. I had some other film opportunities that I wanted to pursue and it's awesome to take that path because you're kind of just more enjoying it, doing your own program, and hanging out with some good friends. Like social media as well these days – it's pretty fun to go out and produce content and post it.
This video is used with permission from Vinny Mauro
If there was a gnarly mountain bike invitational for skiers only, K.C. Deane would be invited; you'd be invited, but who else would there? Who else is a formidable mountain biker from your department?
My good friend Lucas Wachs rips on a bike. Sage Cattabriga-Alosa is an awesome biker. All these freeskiers that don't have anything going on in the summers just spend all summer biking.
You gave an interview about 6 years ago where you said you're getting old. Do you think you're a better skier now than you were 6 years ago?
In different aspects – yes. I’ve focused pretty much all my energy on backcountry skiing. That's one of the things that really takes a lot of experience and time in order to be safe; knowing how to get around and where to go basically. In that aspect I would say I'm better than I was. There's also other aspects of the sport that I was better at back then. It’s a change basically – like an evolution of my skiing. But 6 years ago, I could go to a training park and do a lot more tricks than I could probably do right now. That’s just because I spend more time skiing in the backcountry than in the parks these days.

What do you think about the Little Cottonwood Canyon Gondola project?
I spend so much time up there, but haven't been following their plans closely. But I can definitely say whatever they can do to help with the traffic – I am all for it. Things are just getting crazy up there.
Would you be for, or against an initiative where skiers have to pay to access Big Cottonwood Canyon and Little Cottonwood Canyon?
That's a hard one. I'm not sure about that. If it would limit the numbers of cars going up there every day? Then yeah, I would be for it. I guess Solitude has been charging and I don’t know how effective that’s been. I mean this is such a pinch with Salt Lake City being so close and then only 2 skiers in each car up this tiny little canyon. There has to be something done with the amount of user groups going up there these days.
What are your thoughts on IKON and EPIC passes?
I don’t really get that argument. I don't think that EPIC and IKON pass are really changing it that much. I think people will ski no matter what. People who are going on ski vacations spend all this money to come ski and they're going to buy lift tickets regardless. I know it probably increases the numbers somewhat.
What are your favorite resources for tracking storms?
Ha! I spend far too much time looking at the weather during the winter. I'm on my computer looking at forecasts for Utah, Montana, Idaho, Wyoming, Washington, I use Open Snow the website and app a lot and then I'll see where the storms are heading then kind of dive deeper by looking at SNOTEL, NOAA and pretty much every resource you can think of.
What's the right blend of work, fun, and meeting your obligations to your sponsors?
With skiing, you want to make video projects from your season. You want to be proud of the work, obviously. But you’ve got to remember that you're going out there and skiing with your friends. It's always fun, but it does get stressful sometimes – trying to get certain shots or the weather is just not cooperating and you drive 13 hours to Canada and get rained on and pretty much drive straight back. When things don't go how you want, I try to just brush that off and move on to the next trip or next day of skiing.
Do you have any film projects in the works right now?
We’re filming a team movie for Faction this winter.
What happens behind the scenes when getting footage for a project like this? Does the production team do recon or do you guys just pretty much know where to go depending on the weather?
Definitely tons of recon. That helps a lot with like the whole filming side of things. You can waste so much time looking around while you have a hired film crew ready to film. If you have some objectives and the logistics figured out – you go to the location and get the shots. That's the best way to do it. A lot of times it’s usually some of us getting out on snowmobiles, then ski touring to get to different locations.
The Utah To BC film from the Faction Collective dropped a few weeks ago. Do you have memorable moments from getting the work done?
I’ve been pitching Faction to spend some time in Utah and finally they said “We'll fly Etienne Mérel out there.” Everything we were getting in Utah was snowmobile based, pretty much. It was awesome and we were able to get out everywhere, no problem.
As soon as travel restrictions are over, where's the first place you're going? Will it be a ski trip or a surf trip?
I guess that depends on the timing of everything. I'm definitely looking forward to getting back to Japan. We’re having a killer season right now and it's been a little hard watching everyone see some epic powder over there and being stuck over here. They've gotten more snow than they know what to do with.
What do you have in the quiver this year for ski equipment?
I spend most of my time on the Faction Prodigy 4.0. I ski that in a 185 length. I use Look Bindings and Lange Boots. I stay warm and dry with Saga Outerwear. Oyuki Japan is my glove sponsor. I’m also an EVO ambassador.
Thanks a lot for your time, Tim. We can't wait to run into you again – wherever that may be.
Yeah, definitely. Hopefully you guys have a good winter.
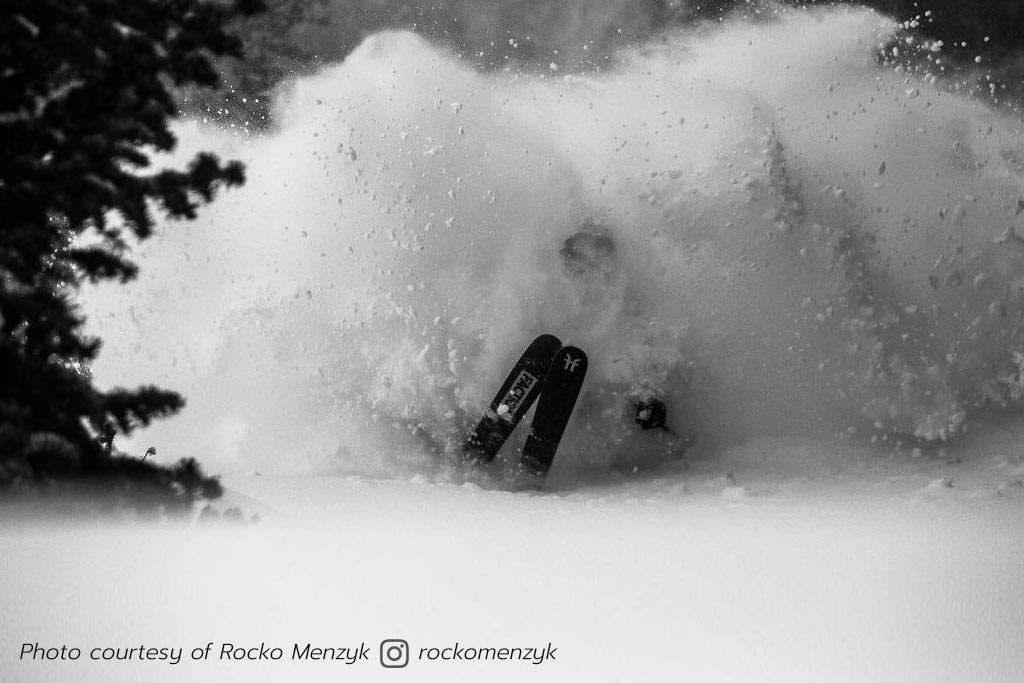
Thanks to these photographers / videographers for allowing us to use their images…
 Vinny Mauro
 Rocko Menzyk
 Christopher Peters